Baking & Pastry > Fillings & Assembly > Cake Assembly Techniques > Crumb Coating Cakes
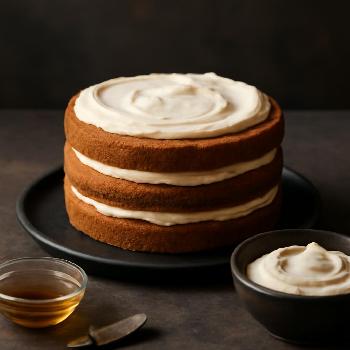
Cake Assembly: A Step-by-Step Guide
Learn how to assemble a cake like a pro with this comprehensive guide. From leveling layers to applying fillings and frosting, this tutorial covers all the essential techniques for creating a structurally sound and visually appealing cake.
Ingredients
- As needed for cake height Cake Layers
- As needed Filling (e.g., buttercream, ganache, fruit filling)
- Sufficient to frost entire cake Frosting (e.g., buttercream, ganache)
- As needed Simple Syrup (Optional)
Level the Cake Layers
Using a long, serrated knife, carefully trim the tops of each cake layer to create a flat, even surface. This ensures that your cake will be stable and won't lean. Discard or save the trimmed pieces for cake pops or trifles. For a moist cake, brush each layer lightly with simple syrup.
Prepare Your Work Station
Place a small amount of frosting on your cake stand or serving plate. This will act as glue to keep the first cake layer in place. Have your filling and frosting ready in piping bags or bowls for easy application.
Assemble the First Layer
Place the first cake layer on the prepared cake stand. If desired, use a piping bag to create a dam of frosting around the edge of the layer. This will prevent the filling from squeezing out.
Add the Filling
Spoon or pipe your chosen filling into the center of the cake layer, within the frosting dam if you created one. Spread the filling evenly.
Repeat Layers
Carefully place the next cake layer on top of the filling. Gently press down to ensure the layers are even and stable. Repeat the process of adding frosting dam (if using) and filling for each subsequent layer.
Crumb Coat the Cake
Apply a thin layer of frosting over the entire cake, including the top and sides. This is your crumb coat, which will trap any loose crumbs and create a smooth surface for the final layer of frosting. Use an offset spatula to spread the frosting evenly.
Chill the Cake
Refrigerate the crumb-coated cake for at least 30 minutes, or preferably an hour, to allow the frosting to firm up. This will make it easier to apply the final layer of frosting.
Final Frosting and Decoration
Once the crumb coat is chilled, apply a thicker layer of frosting to the entire cake. Use an offset spatula or bench scraper to smooth the surface and create your desired finish. Decorate as desired with sprinkles, chocolate shavings, or other embellishments.
FAQ
-
Why is it important to level the cake layers?
Leveling ensures that your cake will be stable and won't lean. Uneven layers can cause the cake to be lopsided and difficult to frost. -
What is simple syrup and why is it used?
Simple syrup is a mixture of equal parts sugar and water, boiled until the sugar dissolves. It's used to moisten cake layers and prevent them from drying out. -
How do I prevent the filling from squeezing out of the cake?
Create a frosting dam around the edge of each cake layer using a piping bag. This will act as a barrier to contain the filling. -
Can I use different fillings for each layer?
Yes, you can customize the fillings to create a unique flavor profile. Just make sure that the fillings are compatible and that the cake can support the weight of the different layers.