Desserts > Dessert Techniques > Decoration Techniques > Piping Frosting (Basic and Advanced Techniques)
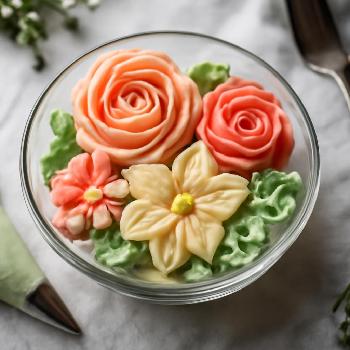
Advanced Buttercream Piping Techniques: Flowers and Ruffles
Elevate your dessert decorating skills with advanced piping techniques to create intricate flowers and delicate ruffles using buttercream frosting.
Ingredients
- 3 cups Buttercream Frosting (stiff consistency)
- as needed drops Gel Food Coloring (various colors)
- 4-5 pieces Piping Bags
- 1 piece Rose Tip (Wilton 104 or similar)
- 1 piece Leaf Tip (Wilton 352 or similar)
- 1 piece Ruffle Tip (Wilton 86 or similar)
- 1 piece Flower Nail
- as needed pieces Parchment Squares
Preparing the Piping Bags and Frosting
Prepare your piping bags as described in the basic techniques. Divide your buttercream frosting and tint each portion with different gel food colorings. A stiff consistency is essential for creating detailed flowers and ruffles. If the frosting is too soft, add powdered sugar, a tablespoon at a time, until the desired consistency is achieved.
Creating Buttercream Roses
Attach a small square of parchment paper to the flower nail with a dab of buttercream. Hold the piping bag with the rose tip so the wide end of the tip is facing down and the narrow end is facing up. Start by creating a small cone-shaped base in the center of the parchment paper. Pipe three small petals around the base, overlapping each other slightly. For the second layer, pipe five petals, slightly larger than the first, and again overlapping each other. Continue adding layers of petals, increasing the size and number of petals with each layer. Gently detach the finished rose from the flower nail and place it on your dessert. Practice is key to mastering this technique!
Creating Buttercream Leaves
Using the leaf tip, hold the piping bag at a 45-degree angle to the surface of the rose (or directly onto your cake). Apply pressure and move the tip slightly back and forth while pulling it away to create a leaf shape. Release the pressure and pull the tip away cleanly. Vary the size and angle of the leaves to create a natural look.
Creating Buttercream Ruffles
Using the ruffle tip, hold the piping bag at a 45-degree angle to the side of your cake. Apply consistent pressure and move the tip up and down slightly while piping a continuous ribbon of frosting. Overlap each ruffle slightly to create a layered effect. You can create different ruffle styles by varying the angle and pressure you apply.
Tips for Success
Keep your buttercream cool and firm by refrigerating it between uses. Use a flower nail and parchment squares to create roses separately, allowing you to arrange them strategically on your dessert. Practice your piping techniques on parchment paper before decorating your final dessert. Consider using different colors and shades of buttercream to add depth and dimension to your decorations. Clean your piping tips regularly to prevent clogging and maintain crisp lines.
Nutrition Facts Estimated per 100g of product
Calories: Approximately 450-550 kcal, Fat: 35-45g (primarily from butter), Sugar: 45-55g, Protein: Less than 1g. These are estimates and can vary greatly depending on the specific buttercream recipe and food colorings used.
Other Important Considerations for Nutrition
Advanced buttercream decorations are often very high in sugar and fat. Enjoy in moderation. Artificial food colorings may have potential health implications. Choose natural alternatives when possible. Consider making smaller, individual desserts to control portion sizes.
FAQ
-
My buttercream rose petals are tearing. What am I doing wrong?
Your buttercream may be too cold or too stiff. Let it sit at room temperature for a few minutes to soften slightly, or add a tiny drop of milk or cream. Make sure you're using consistent pressure when piping. -
How do I transfer buttercream flowers from the flower nail to the cake without damaging them?
Use a small spatula or offset spatula to gently lift the parchment paper square with the flower from the nail. Place the flower (still on the parchment) onto the cake where you want it. Gently slide the parchment paper out from under the flower.