Desserts > International Desserts > Japanese Desserts > Taiyaki Recipe
Homemade Taiyaki: A Classic Japanese Fish-Shaped Cake
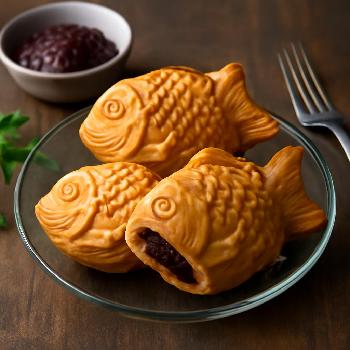
Learn how to make delicious Taiyaki, the iconic fish-shaped cake, at home. This recipe provides a step-by-step guide to creating these delightful treats filled with sweet red bean paste.
Ingredients
- 150 g All-purpose flour
- 50 g Granulated sugar
- 1 tsp Baking powder
- 1/4 tsp Salt
- 1 Egg
- 180 ml Milk
- 20 g Melted butter
- 200 g Anko (sweet red bean paste)
- As needed Vegetable oil (for greasing)
Preparing the Batter
First, in a large bowl, whisk together the all-purpose flour, granulated sugar, baking powder, and salt until well combined. This ensures that the dry ingredients are evenly distributed for a smooth batter.
Mixing Wet Ingredients
In a separate bowl, whisk the egg and milk together until they are fully incorporated. Add the melted butter to the wet ingredients and whisk until the mixture is smooth. The melted butter adds richness and flavor to the Taiyaki.
Combining Wet and Dry Ingredients
Gradually add the wet ingredients to the dry ingredients, whisking continuously until you have a smooth batter. Be careful not to overmix; a few lumps are okay. Overmixing can result in tough Taiyaki. Let the batter rest for about 15 minutes. This allows the gluten to relax, resulting in a more tender Taiyaki.
Heating and Greasing the Taiyaki Pan
Preheat your Taiyaki pan over medium heat. Lightly grease both sides of the pan with vegetable oil. Ensuring the pan is properly greased prevents the Taiyaki from sticking.
Pouring the Batter
Pour enough batter into one side of the Taiyaki pan to fill about half of the fish shape. Place a spoonful of Anko (sweet red bean paste) in the center of the batter. Anko is the traditional filling for Taiyaki, providing a sweet and slightly earthy flavor.
Adding More Batter and Closing the Pan
Pour a little more batter over the Anko to completely cover it. Close the Taiyaki pan and cook for about 2-3 minutes on each side, or until golden brown. Adjust the cooking time as needed to achieve a perfect golden-brown color.
Removing and Cooling the Taiyaki
Carefully remove the Taiyaki from the pan and let it cool slightly on a wire rack. This prevents the bottom from becoming soggy.
Serving the Taiyaki
Serve the Taiyaki warm for the best taste and texture. Enjoy this classic Japanese treat with a cup of green tea for a perfect pairing.
Nutrition Facts (Estimated per 100g of product)
Note: These values are estimates and can vary based on specific ingredients and preparation methods.
Other Important Considerations for Nutrition
Taiyaki is a dessert and should be consumed in moderation as part of a balanced diet. The red bean paste (Anko) contributes to the sugar content, so individuals monitoring their sugar intake should be mindful of portion sizes. Using alternative sweeteners or reducing the amount of sugar in the Anko can be a healthier option.
FAQ
-
Can I use a different filling other than Anko?
Yes, you can use various fillings such as custard, chocolate, sweet potato paste, or even savory fillings like cheese and ham. -
How do I store leftover Taiyaki?
Store leftover Taiyaki in an airtight container in the refrigerator for up to 2 days. Reheat in a toaster oven or microwave before serving. -
Can I freeze Taiyaki?
Yes, you can freeze Taiyaki. Wrap each Taiyaki individually in plastic wrap and place them in a freezer-safe bag. They can be stored in the freezer for up to 1 month. Thaw completely before reheating. -
My Taiyaki is sticking to the pan, what should I do?
Make sure the pan is properly greased before each batch. You can use a pastry brush to evenly distribute the oil. Also, ensure the pan is preheated to the correct temperature before pouring in the batter.